
Conductive Shielding For Guitars

Learn how to do conductive shielding correctly. Discover what it does for the tone and sound quality of your guitar.
What is Conductive Shielding
Relative to electric guitars and bass guitars, conductive shielding for a guitar is a process to block electromagnetic interference which can affect tone. Conductive shielding is done in body cavities that houses electronic components (pickups, pots, etc.). The conductive shielding tape or conductive shielding paint must be applied to all areas of the cavity including the back of covers (pickguards, trem covers, switch plates, etc.)
How Does Conductive Shielding Work
To fully understand what shielding is and how it works you should learn about a Faraday Cage. A properly formed Faraday Cage protects electronic components from external radio frequency interference (RFI).
While doing this is an effective means to protect your tone from disruptive interference a Faraday Cage does not provide full blockage. The good news is that most anything that is not blocked won’t be a problem where you typically play your instrument. Source of interference that shielding paint and tape can block are stage lighting, fluorescent lights, neon signs, and even your own equipment such as amps.
What Does It Do and Not Do
Per a 2013 article by the pros at Seymour-Duncan, here is what you can expect shielding your guitar to do and not do for you:
“Humbuckers themselves don’t hum. But get them near light dimmers, fluorescent or neon lights, and dubious club wiring, and all sorts of buzzing happens. Shielding will never get rid of that 60-cycle hum that is present with single coils. Single coils have their own unique, beautiful sound, and part of that admission to Tone Angeles is that hum. What shielding will do is prevent the wiring inside your guitar from acting like antennae and picking up stray signals floating around. If you want to get rid of hum in single coil guitars, you might have to switch to stacked single-coil sized humbuckers.”
Conductive Shielding Products for Guitars
The best guitar shielding method is to use either specially designed copper tape or specially designed shielding paint. The commonly overlooked but critical aspect of shielding is correctly grounding the tape or paint. If your shielding is not grounded it is effectively worthless.
Should I Do This Myself or Pay a Guitar Tech?
Although this is not a particularly difficult thing to do it makes sense to let a guitar repair shop do this for you. Why should you pay a guitar tech to do this for you? The answer is lower cost and more convenience for you.
Shielding products are usually sold in quantities that will do far more than one guitar. Having so much leftover material means you’re paying for far more than you need. Hiring a guitar tech means the money you would otherwise waste can be used to get a professional job and keep your hands clean. Chances are, the guitar repair shop already has the shielding supplies so you don’t have to order anything or wait a week to get started. You can probably get it done for $40-50 and within 24-48 hours.
Do a Google search for guitar repair near me and you will find someone in your area who can do this work for you. We strongly suggest working with a small guitar repair shop for this service and do not use one of the big-box guitar stores or music centers.
Copper Tape Shielding
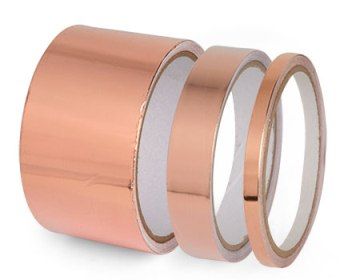
Conductive copper tape is available from several sources. It’s very important to know that you want to use only copper tape with conductive adhesive! Conductive copper tape is sold in rolls of various widths. Conductive copper tape prices vary depending on the width and length of tape on each roll and the quality of the product.
Personally, we believe that StewMac is where to buy copper conductive tape if you really want a quality job. If you rely on sources like eBay and Amazon you really have no assurance that you are getting copper tape that is truly made for shielding electric guitars.
Conductive Graphite Shielding Paint
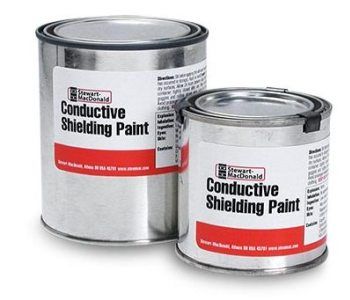
Conductive shielding paint provides a very effective alternative method for shielding your guitar. Shielding paint offers advantages over copper tape in certain situations. Shielding paint makes it much easier to apply protective shielding to hard-to-reach areas and under components that you may not want to remove.
It’s worth noting that not only does StewMac offer what is (arguably) the best shielding paint made for guitars, and they also ship fast and have excellent customer service.
Again, StewMac is where to buy conductive paint if you really want an effective and high-quality conductive shielding job.
If you’re thinking about trying it yourself you need to make sure you have these items to do the work. Here is a list of the things you will need:
- Permanent Marker
- Heat-shrink Tubing
- Masking Tape (Painters Tape)
- Scissors, X-Acto Knife & Wire Stripper Pliers
- Soldering Iron & Flux Core Solder
- Window Cleaner & a Lint-free Cloth
- Socket Set / Nut Drivers
- Screwdrivers (smaller Phillips and Straight)
- Pliers (Needle Nose & Regular)
- Multimeter
- Phone w/ Camera and Notepad/Pen
Alternative Sources for Shielding Paint
If you rely on sources like eBay and Amazon you really have no assurance that you are getting copper tape that is truly made for shielding. The average person is not even close to being able to determine if their can of black shielding paint really is shielding paint. Buying from a reputable vendor is your only way to know you’re not wasting your time and money. If you want to compare shielding paint prices for a similar product you can visit LessEMF.com and compare their YShield Liquid (Cat. #A290-4oz) guitar shielding paint.
How to Shield Your Guitar
IMPORTANT! It is imperative that you understand that doing this work requires removing and replacing electrical components in your guitar. DO NOT attempt this work unless you have the full knowledge, understanding, skills, and tools to complete this project. Mistakes made in attempting this work can ruin electrical components in your guitar!
DISCLAIMER: The following information is provided as a general guide on how to shield your guitar. The exact process for any particular guitar brand or model may vary from this guide. We are not responsible for any problems which may occur when attempting to do this work and directly or indirectly using the information provided herein.
As with any repair or replacement what you remove must be correctly reinstalled. For this work, we strongly recommend using your cell phone to take numerous, clear photos of where items are located, how they are wired together, and other similar details. You should also make written notes. When things are removed sequentially you may want to lay them out in an order that represents how they are to be reinstalled. Precise installation and wiring are critical to prevent damage and have your guitar properly function.
Shielding is effective when all areas shielded are in contact with one another and are grounded. An example is that when it is reinstalled the shielding on the back of a pickguard must be in direct contact with body cavity shielding. When shielding something like an input jack cavity remember to shield the wiring tunnels (holes). You may find this easier to do with pipe cleaners which will hold paint and allow you to reach within the small openings.
Let’s start with applying the shielding material and wrap up with how to ground your shielding system. For this guide, we will discuss the process of using shielding paint. If you elect to use shielding tape you need to cover areas in a similar manner.
Shielding Guitar Body Cavities
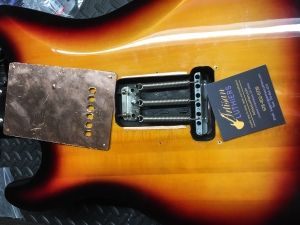
The first step is to remove every component in the body cavities. This includes but is not limited to pickups, pots, switches, input jack, and wiring. In a similar manner, if so equipped, remove the tremolo system specifically including the block, springs, claw, screws, and wiring. As mentioned previously, take photos and notes on placement, orientation, and wiring of all items. You will probably need this information to help you with reinstalling the components.
With the body cavities, all cleared, carefully clean the areas to be painted with a household spray cleaner. Wipe all exposed surfaces and allow the surfaces to fully dry before applying the shielding paint. Your cleaning and paint coats should extend beyond the cavities to the body surface which is covered by a pickguard, trem cover, plate, etc. The paint does not need to be applied to the full edge of the outside of any cover plates but needs to provide a “lip” upon which the shielded cover plates will make contact.
We suggest starting your paint by using a pipe cleaner or a very small brush to paint wiring tunnels (holes). Do the difficult areas first and finish by doing the open areas. Make certain you get complete coverage with good coat thickness but don’t go overboard on achieving thickness.
(If using copper tape start by using a finger to press narrow strips into the routed edges that make the outline of the cavities. Next, apply wide pieces to cover the areas. Start with the bottom, then sidewalls, and include a lap over the edge of the cavities. Ideally, overlaps should be at least 1/8″ wide. You can use an awl or ice pick to make small holes to prep screw holes. Make certain that every bit of the shielding tape is firmly pressed into place and stuck onto the guitar body. You may find it helpful to use the edge of a credit card to rub down the tape.
Pickguards and Cover Plates

While the body cavities are drying you can work on the pickguard, trem cover, or any other rear cover plates. Use conductive copper shielding tape to cover the entire back of every plate. Use an X-Acto knife or razor blade to CAREFULLY cut away any tape that is covering pickup holes. Use an awl or ice pick to make small holes where there are existing screw holes.
Painting cover plates? Adhesion problems applying paint to plastic can be an issue. We strongly recommend using copper tape for plastic cover plates. If you want to try painting cover plates with shielding paint, you should mask off the face side of the plates, clean the rear side of the cover plate, apply a light primer coat and then apply the shielding paint. Note that it is relatively difficult to mask off the edges which means you will probably get paint on the edges – which is very unattractive on those 3-ply covers.
Shielding Your Pickups
Shielding your pickups is not a must-do but it is a good idea. Hopefully, your pickups use shielded wire which gives you a head-start on this part of the job.
When applying shielding tape (not paint!) to a pickguard you must be extremely careful to not damage your pickup. More specifically, you need to watch out for the fine copper wire leads that extend from the windings.
If your pickups have covers that seem to be fixed-in-place DO NOT try to open them. These covers are not meant to be removed!
Generally, you will need to add shielding around the coils and sometimes within the covers. Some pickups, such as Gibson-type humbuckers, do not require you to do anything. If you have a humbucker without a cover you should at least consider installing covers on them.
Carefully wrap the windings (not too tightly) with electricians tape. Next, use 1/2″ strips of conductive tape to cover the electrician’s wire.
If you choose to replace the unshielded wire with shielded wire, or solder tape connection points, you must be very careful to not overheat your pickups.
Grounding Your Guitar Shielding
Grounding is, arguably, the most important part of the process. It is also probably the easiest thing to do.
Sealing the cavity is done when you extend the outside edges of the shielding in a manner where it will have solid, direct contact with the shielding on the pickguard and any cover plates. If this is done you will have effectively created a “sealed box” which nearly equals being a Faraday Cage. (Because your “box” has openings for pot shafts, pickups, etc. you won’t have a true Faraday Cage, but in shielding a guitar you won’t notice the difference).
Inside the body cavity, here’s what you need to do: Use a small metal tab to create a solder lug. Attach this lug to a side wall with a small wood screw. Next, solder a 22 AWG circuit wire from the lug to the housing of the closest pot. This will assure
Reassembly and Parts Installation
Reinstall all components in their proper positions. Pay particular attention to the order and orientation of your pickups. This is your chance to make your work look super professional by neatly routing wiring, making tidy solder connections, and keeping things clean. It is a good idea whenever possible to use electrical tape or heat-shrink wrap to cover hot connections and avoid them coming in contact with your (grounded) shielding. Where possible you may want to use a few zip ties to bundle wires – be certain to trim the ends of the zip ties.
PRO TIPS FOR USING SHIELDING PAINT:
- 1. Have a work area with ample room and lighting. Do this process in a well-ventilated area and provide appropriate cover over the work area (layers of paper, drop cloth, etc.)
- 2. Have a small dish of warm water and a rag within reach to do a prompt cleanup of any paint that gets on your guitar’s finish.
- Completely mask off all of your guitar’s body except where you are going to apply the shielding paint.
- Allow a full 24 hours drying time between coats. Do not try to accelerate drying time with heat guns, etc.
- Carefully put a primer coat on the back of any plastic pickguards or cover plates to promote good adhesion of the shielding paint.
A final note on reassembly: If you scratch the paint or tape you need to cover that area with more paint or tape. You will need to check and adjust your pickup heights and level your bridge if you have a tremolo system. You will need to retune your guitar, possibly including adjusting intonation.


I shielded the cavities of my stratocaster with copper foil, thereafter I painted the whole guitar (not with shielding paint), still have incredible amount of noise.
SOMEBODY PLEASE ADVISE 😉
QUESTION : Does paint on top of copper foil cancel the ‘shielding’ quality? Does the copper need to be exposed?
If the copper tape was properly applied (including overlapping joints you will not need to do anything to the tape. Be certain to apply the copper tape to the back of the pickguard where it covers the cavities.
You may have faulty grounding for the bridge. Lastly, you may need to upgrade your pickups. Let us know how things progress.
I am not sure where you’re getting your info, but great topic. Thanks for the great information. It will be a huge help when I get to the circuit work for my latest project.
The copper tape method works better than paint but it does not install as easy if the cavity is rough or has a lot of curves.
If you have single-coil pickups you need to have your guitar shielded. For a jazz bass, it may not make the hum go away completely but it will definitely help.
Shielding is one of the lower cost mods I’ve had done that I can say truly improved my guitar. Do it and you’ll see what I mean.
Sam Ash sells copper tape at a decent price.
Personally, I think copper tape is better than the paint. Paint is messy, dries out, and in some ways it’s harder to apply.
The style that you write make it truly simple to read. Thank you for including useful links.
Def suggest buying good products from USA vendors and NOT buying Chinese garbage on Amazon and eBay.
Your article reminded me of how my eyes (ears, lol) were opened up after a had my Strat shielded. I used to think shielding work was just a trick for a shop to make money. My tech guy showed me the copper film he used and explained how it works. I was skeptical at the beginning, then I got it back and my Strat was quiet as a mouse. The price for my full Strat was $100 which included a full setup.
I’ve settled on using only copper tape. For me, the 2″ rolls found on Amazon are pretty decent.
If I buy copper shielding tape, is it better to buy flat sheets or the rolls? I know rolls means more cutting but it seems like square sheets mean a lot of waste. Thanks!
might sound like a weird question….can you paint OVER the copper tape. I will be repainting a guitar that already has the tape in it. Do I need to mask off the cavities to avoid getting the paint on the copper? Does it matter? Will the paint inhibit the conductive properties of the tape?
I’ve had good results painting over copper tape. The tape and paint seem to create an electrical contact. Hard to say how good it is long-term though. I’ve only done it about 2 weeks ago, and once dry the multimeter read a proper connection from tape to paint.
I have a metalpickguard…do I need to shield that too?
I think single-coil guitars need conductive shielding. Guitars with humbuckers do not need it. I prefer the self-adhesive backed copper tape products to do my shielding.
If you’re going to do a really complete job, how do you get shielding paint inside of wiring tunnels like going to a jack?
Since the tunnels have the wire going though them, and it’s already shielded (hopefully) then I wouldn’t think you’d have to worry about that.
Agree fully
Interesting comments to consider.
Enjoyed reading the content above, really explains everything in detail. Your article is both interesting and useful. Thank you and keep writing!
Is there any way to shield a guitar and not have to remove electronic parts? I mean, does everything have to be covered or is it okay to just do most of the surfaces of the cavities?
Has anybody ever done shielding on an acoustic-electric? Would it do any good?
Installing a grounding wire and screw is an important part of shielding your guitar.
I appreciate you guys for writing good articles that actually inform, and not just try to promote or sell stuff.
Do you need to do shielding on a guitar with humbuckers? Wouldn’t they, by design, eliminate the need for it?
Any ideas on a good use for leftover copper tape?
I tried this and I don’t think I can really hear a difference in how good my PRS sounds.
Is it true that I should not have to do shielding on guitars with humbuckers? My guitar guy says I should do it but online sources say no. Thanks!
Hi Sonja,
Generally speaking, because humbuckers usually have shielded wire you probably do not need shielding in the pickup cavities. You may notice benefits from shielding the cavities where the electronics reside (pots, jack, etc.). The one certainty is that shielding a guitar is always a good thing.
If you’re using shielding paint, be sure to mask off your guitar finish! It is a pain to clean off of the paint.
Is it okay to use the “scrap” pieces of copper tape? When I use copper tape I always have small, odd-shaped pieces left over.
I totally agree with everything in this article. In particular, buying the Stewart McDonald shielding products. I have another guitar that I did, which did not turn out well, with a “mystery brand” copper tape I bought online. The new tape is a lot thicker and sturdier.
The shielding paint I bought online, which was a good product, was purchased directly from an American manufacturer with great reviews.
Bottom line is that if you use good products this is a worthwhile project for every guitar (or bass).
If you do this correctly it really does make a noticeable difference in noise fed into your amplifier. It’s a good mod to do.
Very good writing. Can you add the pictures of more work?
Do you have any advice for making the pickup cavities larger when rewiring a guitar? Can you do it with a wood chisel or do you have to use a router?
Please allow me to add the recommendation to use the copper foil tape and never the silver aluminum foil product – it’s flimsy and doesn’t work very well.
This is a great project for a Saturday. It may take a couple of hours to do but it’s a worthwhile upgrade. Thanks for the info!
For anyone who is thinking of trying it, aluminum foil is not a substitute for the copper shielding material. The labor to install it is the same so spend a couple of bucks on copper and do it right.
Good info, thanks. Shielding definitely helps if you play near fluorescent lights and other electrical systems.
Don’t forget to clean the back of your plastic pickguard before sticking down the copper foil. If it’s dirty the foil won’t stick very well.
I found the best prices for a lot of these items was on eBay and Sweetwater. Very helpful article. Thanks!
I used your info to buy the materials listed and do the work on my guitars. My cost ended up being around $20 per guitar. Not a bad price for the improvement. Great information. Cheers!
I recently put the foil on my pickguard. By removing the switch, pots, and pickups it took me about 45 minutes to do it. After I installed the foil I used a razor blade to carefully cut around screw holes and openings for the electronics. I think it made a noticeable difference in blocking staticky noises.
I like the idea of using both conductive shielding paint and copper foil. The paint is definitely easier to use on the guitar body (faster, and works better with all the contours.) It makes sense to use the foil on pickguards because the paint does not adhere very well. Your article is very well thought-out. Experience is a great teacher, Thanks for sharing your knowledge!
Shielding definitely works to eliminate fuzzy noise. I like the copper foil better than the paint. Great article, thanks!
Can you paint the back of the pickguard instead of using the metal foil? It would save money but I’m not sure it would stick to the plastic.
Thanks for writing an article with interesting and useful information. In particular, I’m glad you mentioned reputable sources to buy conductive shielding paint.
So far I’ve done two Strats and I can say I definitely do notice the interference noise is almost 100% gone. Keep writing such good stuff!